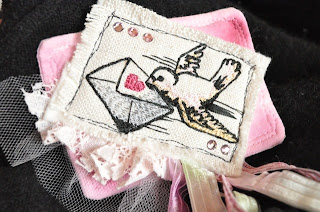
Mini Art Quilt Brooche
For a quick, freeform gift that is sure to please your female friends and family and that can be easily personalized, try one of these little pins.
Start with a central design, in my case these little machine embroideries on linen so they fray and look tattered and vintage. You can use a special ribbon, piece of trim, hanky, patch, antique button or piece of old jewelry...if it's not fabric, mount it on a square of linen or cotton as described below.
For pin back:
Pick two quilter’s cotton fabric scraps approximately 3” by 5” in size. They can be the same or coordinating. One side will be the back of the pin; the other will show from the front.
Make a quilt sandwich with a similar sized piece of cotton batting, layered fabric right sides together, and batting on top.
Start sewing 1⁄4 inch seams, beginning one inch in to one long side, and continue around the other three sides, turning the final corner and sewing just one inch in, leaving an opening to turn. Snip corners diagonally to make turning easier on this small piece.
Turn right sides out. Pin the opening shut and topstitch to close, 1⁄4 inch from edge, continuing around all sides as a topstitch finish. This is a great place to change thread color to a decorative accent thread that will be seen from the front.
You now have your mini quilt base.
Cut out your embroidery design, or other central embellishment scrap, in a rectangle, approximately 1⁄2 inch larger than the design. Snip the cotton batting (if you used it) about 1⁄4 inches closer in to the embroidery design leaving room to fray the linen rectangle’s edges for a tattered appearance.
Now that we have all our elements ready, it’s time to get creative. Be brave. Take scraps of ribbon and lace or cord, and loop and drape them in one corner of your fabric mini quilt. See what appeals to you. Bunch it, scrunch it, gather it till it looks right. Sew it down with the sewing machine in a few tacking stitches.
Take lace or cheesecloth scraps and build a trim ruffle on the top or side of your mini quilt, each time laying the embroidery over the top to see where it would best fit, and to make sure the embroidery element will eventually cover your tacking stitches. Tack down the ruffle or puff of fabric trim.
Lay the embroidery design on top of the mini quilt collage. Experiment with best layout, load contrasting top thread on your machine, and sew down onto mini quilt. Stitch around the embroidered rectangle a couple of times like you were sketching an outline with a pen...this stitching looks better if it is not perfect and if each line of stitches wavers and wiggles a bit.
In my samples, I used a fabric pen to add some color interest. I wet my mini quilt base before starting to layer the embroidery and embellishments. Then I took the fabric pen and touched it to several areas of the wet cotton, and let the color “bleed” into the weave and create a sort of mottled color effect. If you use solid muslin, this will be most successful, as a print or deeper colored fabric won’t take dye as well. Heat press to set with a hot iron.
Experiment with buttons, trinkets, beads on top of the embroidery. At the top, or the bottom, on the embroidery itself, see what looks best and hand sew the embellishment onto the mini quilt collage. Add hot fix rhinestones if desired directly onto the embroidery or around the quilt top to add some sparkle. You can also hand sew on beads, crystals, old broken jewelry or any other bit of bling to enhance your art quilt.


No comments:
Post a Comment