Friday, December 7, 2012

Excerpt from "Bewitching Quick Stitching" by                 Beth Maitland...  Quick Holiday Gift Idea:
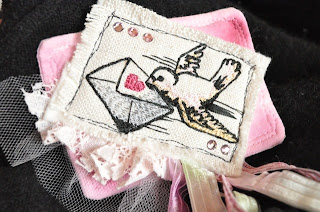
Mini Art Quilt Brooche


   For a quick, freeform gift that is sure to please your female friends and family and that can be easily personalized, try one of these little pins.


Start with a central design, in my case these little machine embroideries on linen so they fray and look tattered and vintage.  You can use a special ribbon, piece of trim, hanky, patch, antique button or piece of old jewelry...if it's not fabric, mount it on a square of linen or cotton as described below.

For pin back:


 Pick two quilter’s cotton fabric scraps approximately 3” by 5” in size.  They can be the same or coordinating.  One side will be the back of the pin; the other will show from the front.

Make a quilt sandwich with a similar sized piece of cotton batting, layered fabric right sides together, and batting on top.
Start sewing 1⁄4 inch seams, beginning one inch in to one long side, and continue around the other three sides, turning the final corner and sewing just one inch in, leaving an opening to turn.  Snip corners diagonally to make turning easier on this small piece.
Turn right sides out. Pin the opening shut and topstitch to close, 1⁄4 inch from edge, continuing around all sides as a topstitch finish. This is a great place to change thread color to a decorative accent thread that will be seen from the front.
You now have your mini quilt base.

       
Cut out your embroidery design, or other central embellishment scrap, in a rectangle, approximately 1⁄2 inch larger than the design. Snip the cotton batting (if you used it) about 1⁄4 inches closer in to the embroidery design leaving room to fray the linen rectangle’s edges for a tattered appearance.
Now that we have all our elements ready, it’s time to get creative. Be brave. Take scraps of ribbon and lace or cord, and loop and drape them in one corner of your fabric mini quilt.  See what appeals to you.  Bunch it, scrunch it, gather it till it looks right.  Sew it down with the sewing machine in a few tacking stitches.
Take lace or cheesecloth scraps and build a trim ruffle on the top or side of your mini quilt, each time laying the embroidery over the top to see where it would best fit, and to make sure the embroidery element will eventually cover your tacking stitches.  Tack down the ruffle or puff of fabric trim.
Lay the embroidery design on top of the mini quilt collage.  Experiment with best layout, load contrasting top thread on your machine, and sew down onto mini quilt.  Stitch around the embroidered rectangle a couple of times like you were sketching an outline with a pen...this stitching looks better if it is not perfect and if each line of stitches wavers and wiggles a bit.
In my samples, I used a fabric pen to add some color interest.  I wet my mini quilt base before starting to layer the embroidery and embellishments.  Then I took the fabric pen and touched it to several areas of the wet cotton, and let the color “bleed” into the weave and create a sort of mottled color effect.  If you use solid muslin, this will be most successful, as a print or deeper colored fabric won’t take dye as well.  Heat press to set with a hot iron.
Experiment with buttons, trinkets, beads on top of the embroidery. At the top, or the bottom, on the embroidery itself, see what looks best and hand sew the embellishment onto the mini quilt collage.  Add hot fix rhinestones if desired directly onto the embroidery or around the quilt top to add some sparkle. You can also hand sew on beads, crystals, old broken jewelry or any other bit of bling to enhance your art quilt.


Wednesday, December 5, 2012

Holiday Tip #17:  SPREAD KINDNESS!

Last night, after a long two days of my sitcom production job and my three hour commute, I was getting ready to start the drive home and stopped at a Starbucks for coffee to keep me awake.  I was in line but daydreaming about all the work I have to do in the next 24 hours and stepped up to place my order.  The barista smiled and took my name for the cup and walked away.  My money was out, but he didn't tell me my total.  Confused, I waited at the register.  When he returned, I said, "How much is it?" (a little aggravated)  He  replied, "The person in front of you bought your drink.  It's been happening since about ten this morning."  

I handed him some bills and said, "Buy the next guy's and keep the change.  Merry Christmas."

One small, inexpensive gesture changed my whole three hour drive home...and perhaps my week.

Pass it on...

Monday, December 3, 2012


**Holiday Low Sew Idea**

The Project:  BUNTING!!

Now we’ve scoured the magazines and websites and project books and found the perfect holiday gift project for our family and friends...or at least a few of them.  It’s time to get cookin’.

For me this year, it’s bunting!!!  I love all things English (UK actually, add Irish and Scottish to the list), and found many darling ideas for bunting construction on etsy.com and in several craft magazines, as well as on some DIY craft websites.  I think the gift of celebration decorations sounds like fun, and a few of my family plans will happen after Christmas, so I’m going with non specific (non-holiday) fabrics and colors.  I’m also considering adding noise makers, gag prizes, bubbles, glow sticks and small party trinkets for a “party-in-a-box”.  I can find things like that at party stores or dollar stores, and the children in the homes that will receive these, will have a blast.  They can start by using all this for New Year’s Eve.  

The next step for me is to personalize the project somewhat.  I like to make adjustments to the ideas I see, with respect to materials, technique, color scheme, etc. to make them my own.

I want a faster to sew and a bit stiffer version than the ones I’m seeing, so I’m borrowing some tips from scrapbooking and using scalloped edge fabric scissors to cut out the flags.  When I construct the flags, I will leave the cut edges exposed which looks fun and tattery, and saves the step of turning and finishing.  In addition, I’m adding a layer of thin cotton batting between the top and backing fabrics I choose, to give the flags more body.   I pick color schemes for each household to go with their home furnishing colors, not a specific holiday.  That way they can use the bunting and accessories for any celebration, birthday, holiday, or just festive dinner at home, and I’m adding a complementary table runner in the same fabrics to go along with the bunting flags as a set.  This completes the “party-in-a-box” idea.

I’ve also decided to make the flags double sided.  So they can be turned around for a different look.  

For my first set, I’m designing for two homes that have a modern decorating scheme, so I’ll pick black and white fabrics in geometric prints and a couple of florals, and add some red, black, and white prints for a little color.  Several of the newest fabric collections did not disappoint, and I found lots of choices in my stash and at the local quilt shop.  I’ll use six black and white prints on one side of the flags, and six red, white and black prints for the other side.  When I sew them together with the batting in a mini quilt sandwich, I’ll mix up the combinations for interest.  


And I picked a ticking stripe in black and white for the tie strip to hold the banner flags.  


I’m making two or three sets at once to save time while cutting and sewing.  Like an assembly line, I can cut everything in one step and save time and materials.  I sew two or three long ties out of the ticking fabric.  Then I can sew a big pile of flags and mix them up and rearrange them when I’m applying them in the last step to the ties.


With the extra fabric, I can sew simple scrappy table runners or table toppers that use patchwork or panels, whichever I have time for, and I end up with a fabulous custom gift set that will be remembered all year long when it’s brought out for celebrations for all kinds of occasions.  It may even inspire some new family traditions.  I’m up for that!

Now that I have a fun idea that I think my families will like, it’s time to explore other colorways.  And start thinking of girlfriend gifts...something with roses maybe...

Stay tuned.


Saturday, December 1, 2012


Have Yourself a Home-made Holiday:  Start a Project!

There’s something about the end of summer, school days beginning, and the dry, hot days in southern California.  It’s too hot to be outside, but the kids are back in school, so the lazy summer days have ended for another season.  All the yearnings for cooler weather, fall colors, pumpkin patches...they are all overwhelmed and overshadowed by the size of my Christmas gift list.  As if it’s a surprise, I am suddenly (it happens every year!) thrown into a frenzy of Christmas gift production.  My family rarely sees the surface of the dining room table from September through October...sometimes right up till we need it for Thanksgiving.  And they’re pretty good sports about doing homework on the sofa and eating in the den.  I think it’s as much a part of the Holidays coming for them as it is for me.  This year, we moved, and I’m all thrown off, so midnight oil is on my supply list...we better get started!!

I start looking for that one idea for a project that takes a moderate amount of time, and can be adjusted or personalized for many different people and their interests or color schemes.  Sometimes it has to be a couple of main projects, since my circle is pretty varied.  My list always includes family members with lots of new babies or young children, single men, girlfriends (they’re the easiest...I just pick what I’d like myself) and co-workers, all of whom need to be remembered in a personal way.

My embroidery machine has made gift giving just brilliant, but it gets more challenging each year to pick something I haven’t done before.  I don’t want everyone I know to have six aprons and four sets of personalized napkins from me, but my desire to use quilting and machine embroidery limits my projects to cloth and paper and things that I can hoop or quilt!

First, I try to be realistic about how much time I’ll have with work and family and the other demands my small farm make on my time.  Next, I think about my budget and materials, and look for a reasonable supply list that I can save money on if I make several or save time on if I do the projects like an assembly line in phases.  Then I start to sort through ideas.

The Internet is a great place to start for ideas.  Crafting blogs, embroidery design websites, and sewing product sites have great tutorials and free project instructions and keep their ideas popular and fresh.  I have a few favorite sites, but you can just Google handmade holiday gift projects.  But my favorite resource is a local bookseller or newsstand for fall and holiday issues of craft, quilting, embroidery, and hand-made gift magazines.  I love to go through them over and over to collect ideas for that perfect inspiration.  Sometimes just an image or a decoration in the background of an ad will take my imagination to the most amazing project.  And then, I take a look at the many beautiful and helpful instruction and project books in the book store craft section.  I can tell just by the photos if the book contains project ideas that are my “this year” style and taste.  Remember crafting has a trend set just like fashion and pop culture.

This selection process is the most exciting part of gift making for me.  Picking the gift ideas is as much fun as watching my friends and family open the gifts I have lovingly hand made for them.  But if I’m honest, making something fabulous each year for each person on my list is pretty high pressure.

I read an interesting article a few years ago on gift giving.  It has really stuck with me.  The author reminded us that although we strive for it, not every gift for every occasion is  going to be the perfect gift.  We need to keep that in mind, especially crafters, who invest time and effort and love, as well as money.  Some years, our gift will be the most remembered, the most clever, the most needed, the most beautiful.  And that should be enough.  We won’t be able to hit it every year, but a thoughtful remembrance for those we love, given and often made from the heart, is always appreciated.  We shouldn’t set ourselves up to outdo each year.  Just do our best, and be our thoughtful selves, and each gift giving opportunity will be special.

Now, let’s get out the sewing machine and glue gun and make a crafty mess!!!!


Friday, November 30, 2012

Holiday Starter RX!  Countdown Tip #1
To get off on the right foot, start the Holiday Season with a pedicure, a cup of something warm and soothing, and a note pad (or your iPad) and make your list while you're pampered, starting with your toes.
Seriously the best way to gather your thoughts, relax for a few minutes, and reflect on the Season, your blessings, your family and friends, and all the delicious plans you have to make.
I went with a subtle, Gothic Red, but go with the nail art if it suits you, and twinkle up your toes to get in the perfect frame of mind!

Now that the list is ready and you're refreshed...
Let the Holidays Begin!!

hugs,
Beth

Thursday, November 29, 2012

Hello InterWeb! Blog, Vlog, YouTube Channel!

The Dramaqueenbee Meets the Internet!

My first blog post is really just an introduction to my other cyber neighborhoods, and a statement of my commitment to enter 2013 making friends with the WorldWideWeb.  

I've started slow, but I'm getting into the swing of it, and I'm trying new ways to reach out!  I have so many projects and ideas I want to share.  So let's get going!!

Check out my website, for photos, bio, resume, contact information and links to appearances and projects here:

http://www.BethMaitland.com

Watch my upcoming videos galore on my new YouTube channel here:

http://www.youtube.com/user/TheDramaqueenbee

Join my fan page on Facebook here:

https://www.facebook.com/pages/Beth-Maitland-DramaqueenBee

Check out my various actual quilts, textile creations, vintage fancies, and even my soon to be released quilting and project book at my Etsy store here:

http://www.etsy.com/shop/dramaqueenbee

I'm not tweeting yet...but that comes after some video tutorials, a few "haul" vids, and some welcome to my world posts.

For a girl who grew up with a rotary phone you actually had to dial in a circle...and a 32" black and white GE TV, I've come a long way.  Wanna come along?   =)